วันอาทิตย์ที่ 11 มิถุนายน พ.ศ. 2560

Bluetooth RC car controlled by Aduino via Android Application


       The instruction introduce to build a radio controlled car by Bluetooth connection with Arduino controller via Android application.

       The steering motor and driving motor are operated by TB6612FNG dual motor drive module.

Materials and Tools
Materials
1.RC car toy.


2.Arduino NANO


3.HC-06 Bluetooth module for Arduino.


4.TB6612FNG Dual H-Bridge motor drive module.


5.Dupont wires 


6. 2-LEDs(White for front light and Red for rear light)
 

7. 2-Resistor 1 kohm. 1/4 watt.


8.Piezo buzzer.


9.Diode 1N4004
10.IC Regulator 7805
11.Capacitor 22 microF.
12.Capacitor 47 microF.
13.DIY PCB


14.Wires


15.JST pig tail
16.Pin header
17.Shrink tube

18.Velcro
19.2s Lipo Battery 7.4 V.


Tools
1.Screw driver
2.Plier
3.Fixing material : screws
4.Soldering gun
5.Soldering wire
6.Soldering paste

Hardware assembly & Electrical wiring

1.Dismantle toy radio control board and cut some unuseful plastic for preparing DIY PCB space.
2.Install and solder Arduino NANO,Buzzer,TB6612FNG module on DIY PCB.
3.Install LEDs front and rear lights on car body.
4.Wiring all components together as circuit diagram.
Caution : Making good soldered ground,otherwise many false will appear.
Arduino pins to HC-06 :
0 - Tx
1 - Rx
2 - State
GND - GND
VCC - 5V supply

Arduino pins to TB6612FNG motor drive module :
12 - BIN2
11 - BIN1
10 - STBY
9 - AIN1
8 - AIN2
7 - backLights LED
6 - Buzzer positive+
5 - PWMB
4 - frontLights LED
3 - PWMA

TB6612FNG motor drive module :
VM - Battery positive+
GND - Battery ground - NANO's GND
A01 - Driving motor
B01 - Driving motor
A02 - Steering motor
B02 - Steering motor

The sketch code and Android application
Arduino sketch code :
1.Down load TB6612FNG library from SparkfunGithub and add to Arduino IDE.
2.Down load sketch.ino from Github.
2.Upload sketch to Arduino controller.(Before click upload ,it's necessary to take HC-06 Bluetooth 5V. power off)

Smart phone/Tablet Android application installation :
1.Open Google play store.
2.Install Arduino Bluetooth RC Car application on smart phone.
Bluetooth HC-06 with smart phone Connection :
1.Open Android setting to connect bluetooth device.
2.Pairing Bluetooth communication between smart phone and HC-06.
 2.1 Scan for device and make pairing.Default password of HC-06 is "1234".
 2.2 Open application and click Bluetooth connection button to connect to RC car.
 2.3 If communication complete,green light should appear.If communication does not complete,red light will blink.Try to pair device again.
3.Playing RC car ,testing every function.


วันพฤหัสบดีที่ 6 เมษายน พ.ศ. 2560

How to Build 8 Channel Transmitter nrf24l01 Arduino


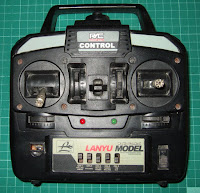
       The instruction "How to build 8 Channel Transmitter nrf24l01 Arduino" introduce how to make 8 channel transmitter from 4 channel RC plane.All existing electronic boards had been taken off ,remaining 4 potentiometers of each control channels would be used after and adding new 4 potentiometers for more 4 control channels.
        The rebuilt transmitter would be operated by Arduino controller.The new design program should be applied to remote control various devices via nrf24l01 radio module such as robotic arm,multi servoes,rc planes,rc tanks,rc cars,rc boats ,etc.
        See the application for 8 Channel Transmitter in "How to Build Gripper Tracked Robot Via Nrf24l01 Arduino"
       
Materials & Tools
1. 1 - Arduino controller - Nano


2. 1 - NRF24L01+PA module with SMA anttenna


3. 1 - Socket adapter for NRF24L01(For protect & stabilize NRF24L01 module)


4. 2 - LED 4 mm.(green and red)


5. 2 - Resistor 1 kOhm. 1/4 watt.(Option)


6. 1 - Capacitor 0.1 microF /50V.


7. 1 - Capacitor 1 microF /50V.
8. 1 - Capacitor 100 microF /50V.
9. 1 - Diode 1N4001
10. 1 - 7805 IC Regulator 5V.
11. Dupont wires


12. Female pin header


13. Dupont Jumper Cable Housing Male Pin Connector


14. Dupont Jumper Cable Housing Female Pin Connector


15. Male JST Battery Pigtail


16. Heat shrink tube 1.5 - 10 mm.


17. Velcro tape


18. 1 - PCB.DIY. circuit board


19. Battery Lipo 7.4 V. 1000 mAh (2 cells)


20. 4-Channel RC Transmitter


21. 4 - B10K potentiometers


22. Electrical 26 AWG wires


Tools
1. Soldering gun
2. Soldering wire
3. Soldering paste
4. Screw driver
5. Plier
6. Hot glue gun
7. Epoxy glue
8. Two sides glue tape
9. Plastic cutter
10. Electrical drill 

Body Modification , Electronic Parts Installation & DIY PCB
Body modification & DIY PCB
1. Open transmitter body up,remove old existing PCB ,leave 4 potentiometers Aileron,Elevator,Throttle,Rudder.
  

2. Make DIY PCB according to circuit diagram.(See pin connection below)
*Soldering all devices carefully ,use enough large wire.Making good ground.
3. Drill transmitter body for installing 4 more potentiometers.
4. Cut off plastic body to open a hole for Nano USB.
5. Paste Velcro tape at the transmitter back for battery attachment.
6. Install DIY PCB and NRF24L01 module on transmitter body by hot glue.
7. Connection wiring between DIY PCB , Potentiometers , main switch and battery terminal.

8. Assemble transmitter body back.
*Before connecting battery,check out to find short circuit points on DIY PCB.Otherwise it can smoke and burn everything. (Be careful of Lipo battery , it's high current supply , short contact will spark fire)
Arduino Nano Connection pin No :
A0 - Auxillary4 potentiometer
A1 - Aileron potentiometer
A2 - Elevator potentiometer
A3 - Throttle potentiometer
A4 - Rudder potentiometer
A5 - Auxillary1 potentiometer
A6 - Auxillary2 potentiometer
A7 - Auxillary3 potentiometer
D3 - Throttle hold LED
D7 - Throttle hold switch
nRF24L01 module Socket adaptor to Arduino Nano pin No :
Vcc - 5 V. supply (Do not connect 5V. direct to nRF24L01 module,it's supplied only 3.3V.)
GND - GND
CE - 9
CSN - D10
SCK - D13
MO - D11
MI - D12
IRQ - D2
*If you have communication problem,you can change connection from pin 13,11,12 to pin SCK,MOSI,MISO of Nano programming pins.
*It's necessary to add 0.1 microF to nRF24L01 module pin Vcc/GND because the module needs stable current and voltage. Also solder a small wire at the antenna to increase control range.
Software Installation
1.Down load nRF24L01 module library zip file from https://github.com/maniacbug/RF24/downloads.
2.Add library zip file to Arduino IDE.(After finish addition, you will see new library RF24-master in Examples menu.)
3.Before using new nRF24L01 modules,we shall burn the modules by uploading default sketch pingpair and GettingStarted for tuning up frequency otherwise it will has uncommunication problem. (Use another Arduino Nano/UNO and nRF24L01 modules for pairing)

4.After matching the frequency ,we can upload Tx code sketch from GitHub to rebuilt transmitter.


วันอาทิตย์ที่ 2 เมษายน พ.ศ. 2560

How to Control Tracked Robot Via 3-Channel RC Transmitter Arduino


    Instruction introduces how to control Tracked robot via 3-Channel 2.4G Transmitter-Flysky's protocol by using arduino controller to read receiving code to transform command to control L298N dual motors driver module.

Materials
1. 1 - Arduino controller - Nano


4. 1 - L298N dual motor drive module


5. 1 - Tamiya track and wheel set


6. 1 - Tamiya dual geared box


7. 1 - Tamiya plastic perforated plate


8. Dupont wires


9.Female pin header


10. Dupont Jumper Cable Housing Male Pin Connector
11. Dupont Jumper Cable Housing Female Pin Connector
12. Male JST Battery Pigtail


13. Heat shrink tube 1.5 - 10 mm.


14. PCB - DIY circuit board


15. Velcro tape


16.Wires


Parts & DIY PCB Installation
Connecting and soldering electronic parts on DIY. PCB according to circuit diagram.


Arduino Nano pin to L298N Pin No :
D3 - ENA
D4 - IN1
D5 - IN2
D6 - IN3
D7 - IN4
D8 - ENB
Arduino Nano pin to Flysky receiver Pin No :
A0 - CH1
A1 - CH2
A2 - CH3

Software Installation
Arduino sketch and Library :
1.Down load sketch from GitHub.
2.Upload sketch to Ardunio Nano.
3.Test the Tracked robot.If the wiring connection was well done.It should work fine.